Before You Get Started...

Warm surfaces and 3M tape with heat gun if ambient temperature is below 68 degrees F
|

Any Modification or unintended use will void the manufacturers warranty
|

A dry fit of all pieces must be performed before the final installation of the product to ensure fit
|

Products cannot be returned for a full refund after the red backing to the 3M tape is removed
|
FOR ACRYLIC OR PAINTED COLOR MATCH VERSIONS
DO NOT BEGIN INSTALLATION BEFORE VERIFYING COLOR MATCH!
REVIEW COLOR MATCH INSTRUCTIONS HERE
DO NOT BEGIN INSTALLATION BEFORE VERIFYING COLOR MATCH!
REVIEW COLOR MATCH INSTRUCTIONS HERE
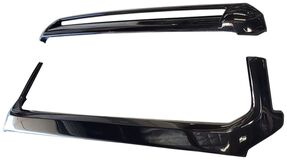
Items Included• Grille Surround Overlay: 1
• Hood Bulge Overlay: 1 • Preinstalled 3M tape • 2 Adhesion Promoter Packets |
|
Tools Required• Isopropyl Alcohol
• Masking tape (non-marking tape) |
PREPARATION
1. BumperShellz™ are secured using the highest quality 3M Auto-Grade tape. The optimal temperature for installation is between 68°F and 100°F. If the ambient temperature is below 68°F use a heat gun or hair dryer to warm the bumper and 3M tape immediately prior to installation.
2. Ensure the surface is clean. After a quick wash use Isopropyl alcohol lint-free cloth to clean the surface thoroughly. For professional results use 3M brand prep solvent 70, Adhesion Promoter 94, or a similar vinyl adhesion promoter product.
3. Dry fit all parts before removing 3M tape to check for fitment and practice the installation method before the attachment is permanent.
The degree to which you follow these preparation instructions will determine the quality of the installed product. Please follow all instructions and be patient. If you are unsure of any area of the installation after reading these instructions, please call us at 844-918-3688, and we will answer any questions that you have.
Getting Started
1. Complete a dry-fit using the following steps 3-10 without removing the backing to the red 3M tape.
2. Clean the surface thoroughly with Isopropyl alcohol and apply the adhesion promoter to the areas of the grille surround and hood bulge where the 3M tape will be attaching, especially around the perimeter.
3. Remove the backing to all sections of 3M tape.
|
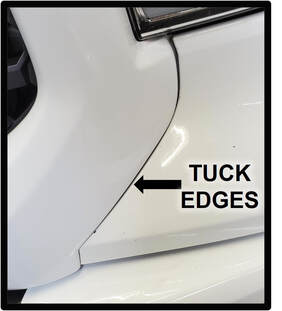
4. Tuck the edges of the surround in so that they nest inside the panel gaps of the front fascia. Remember to not let the exposed 3M tape touch down until you are completely satisfied with the position of the part.
|
|
|
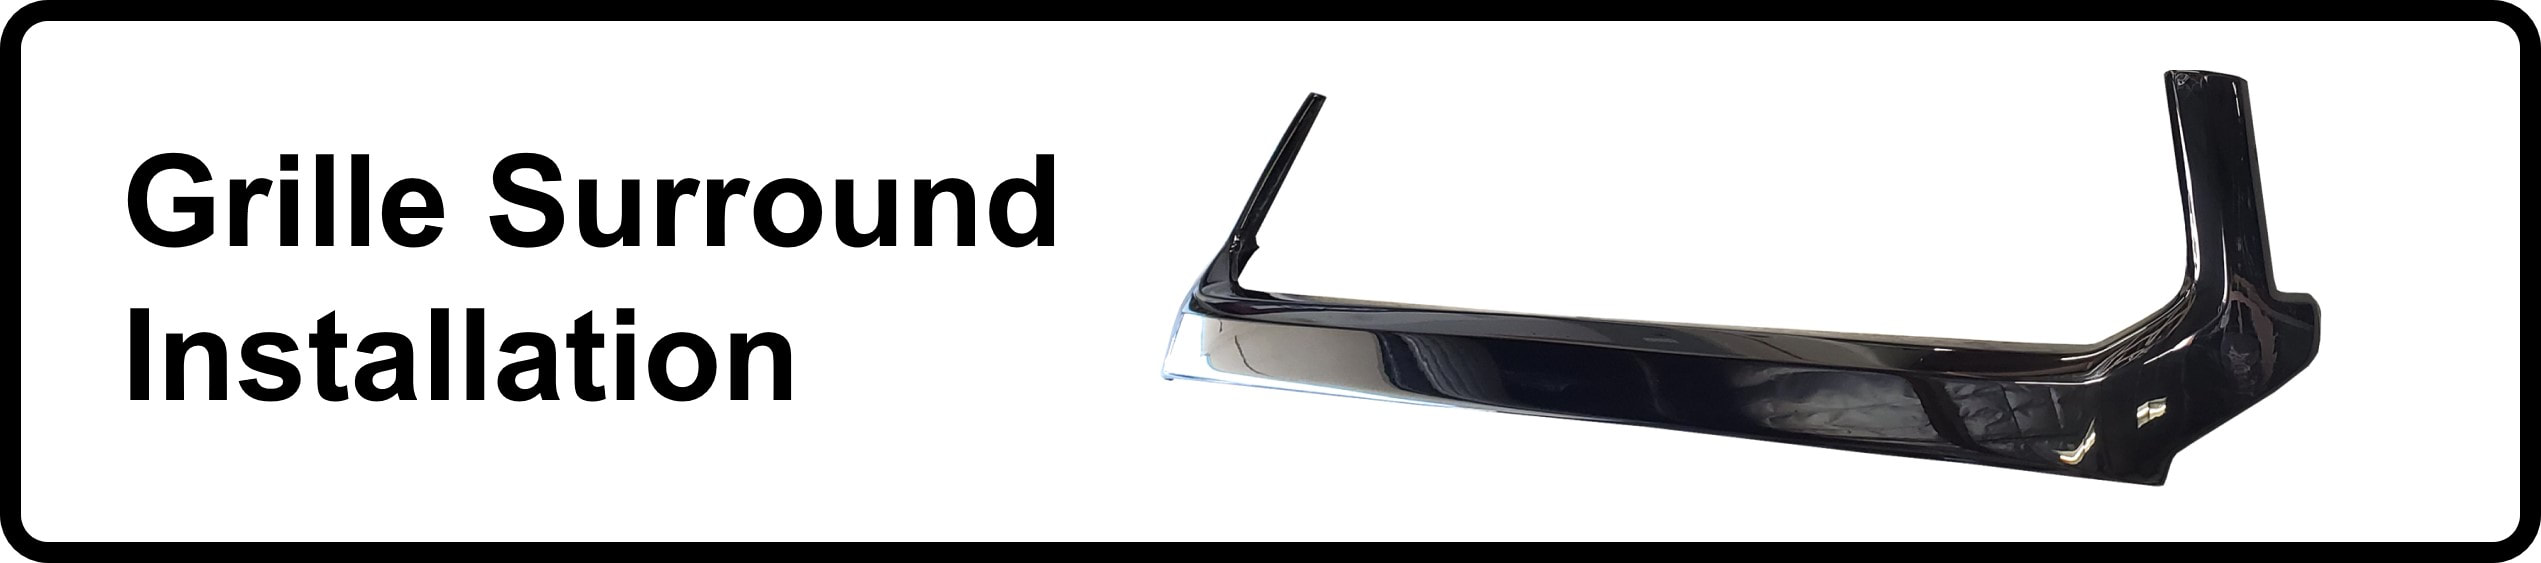
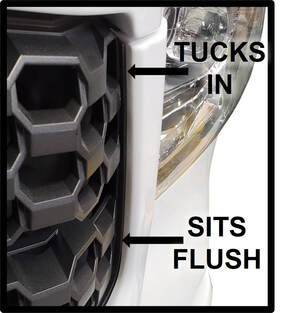
5. With the part in position and almost adhering, tuck in the inside ring of the grille surround. The top portion of the inside of the grille surround is designed to tuck in snugly between the outside of the grille and inside of the grille surround. This edge will gradually get shorter until it daylights near the bottom of the vertical edge and begins to sit flush against the border to the inner grille.
6. With the Grille Surround now properly positioned, put firm pressure on all areas of the overlay where the 3M tape has been applied.

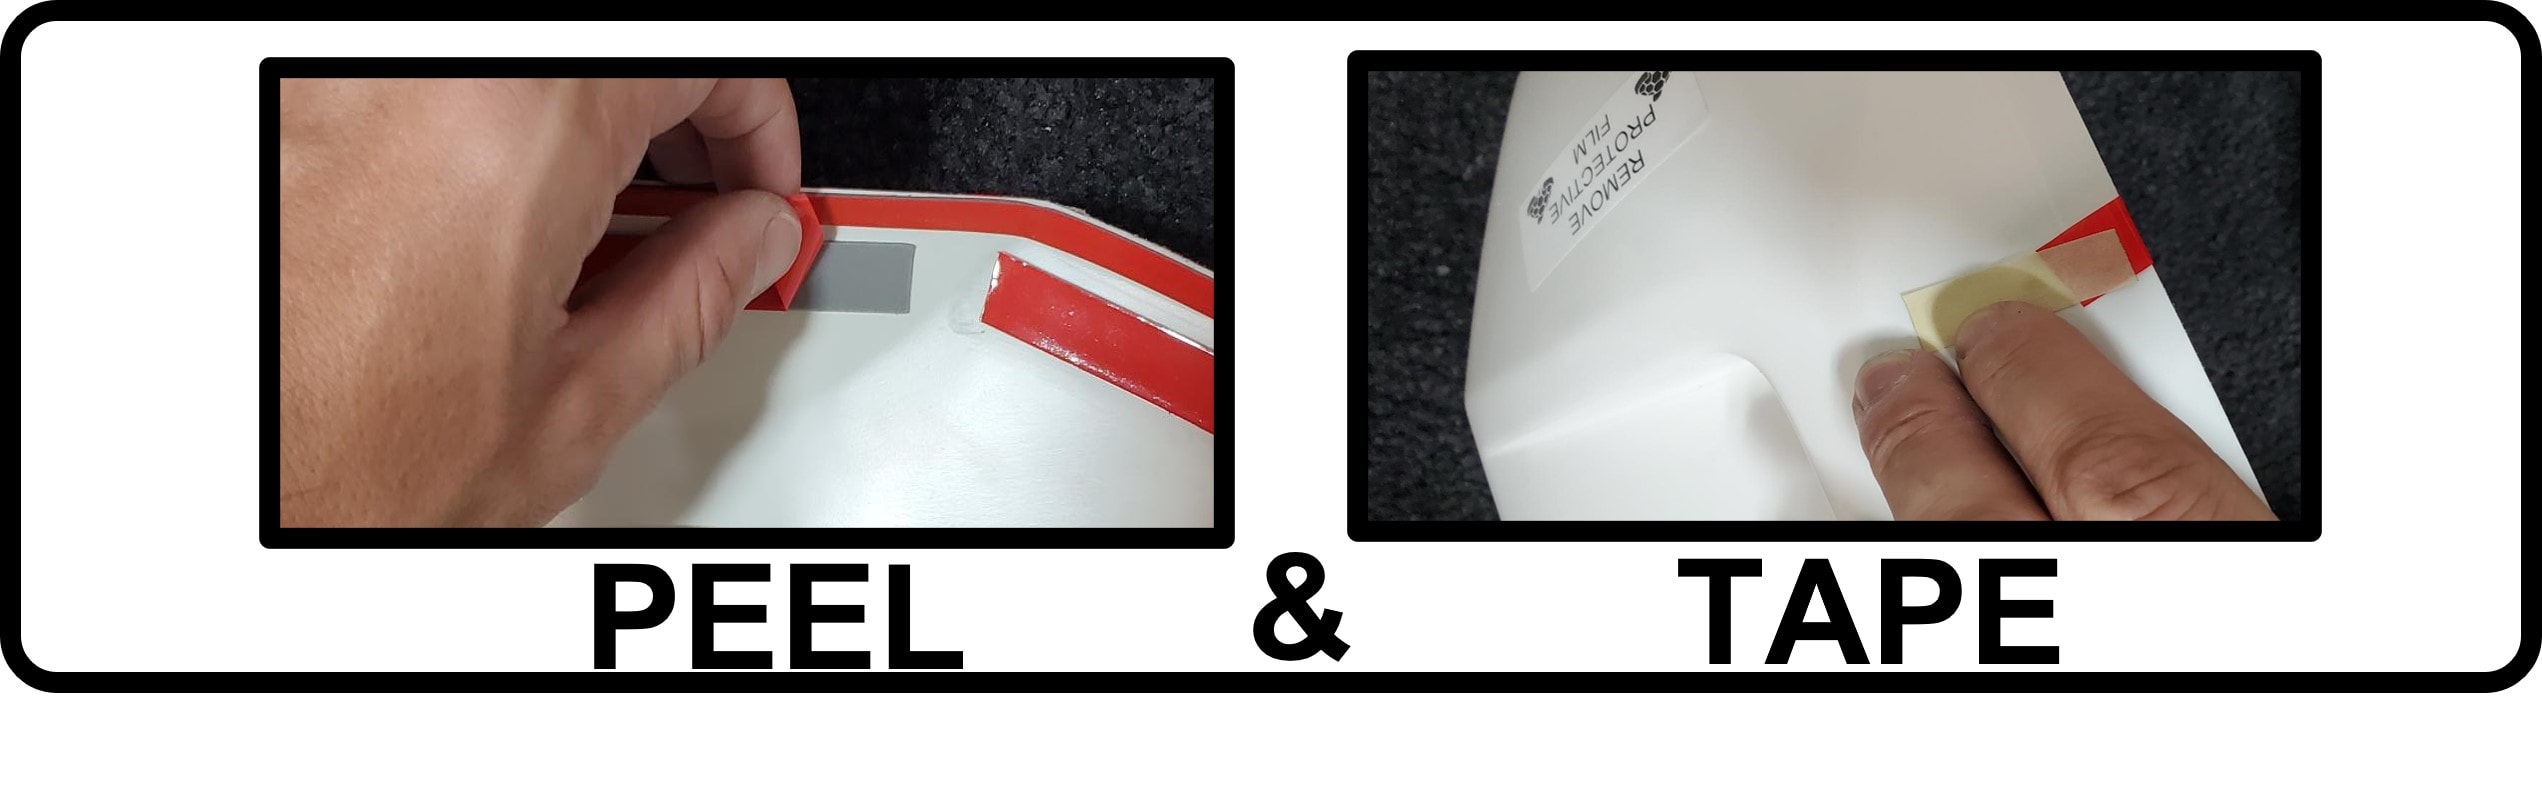
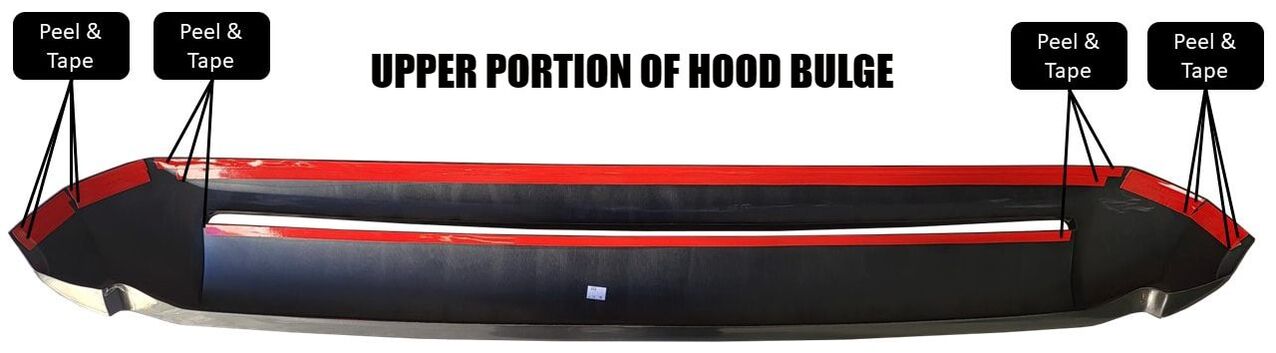
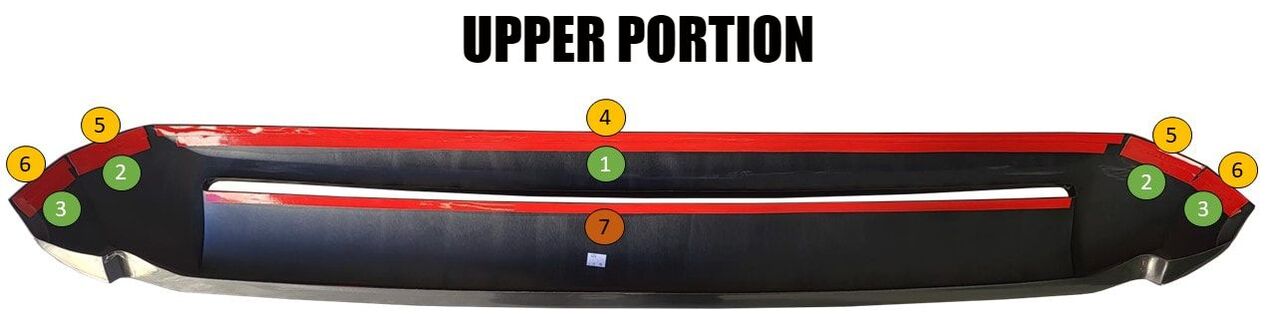
3M red tape backing preparation process
On all perimeter sections of tape including the strips on the top and bottom edges, and the edge of the intake cut-out, you will perform a “peel and tape.” In these areas, peel back the first 1-1 ½ inches and tape it to the front surface with a non-residue tape (masking tape) as indicated in the images below for access after the overlay is properly positioned over the Hood Bulge. It is also wise to perform this on each end of each section of tape for redundancy. (note: The reason for this method is to allow you to perfectly position the overlay before adhesion is permanent).
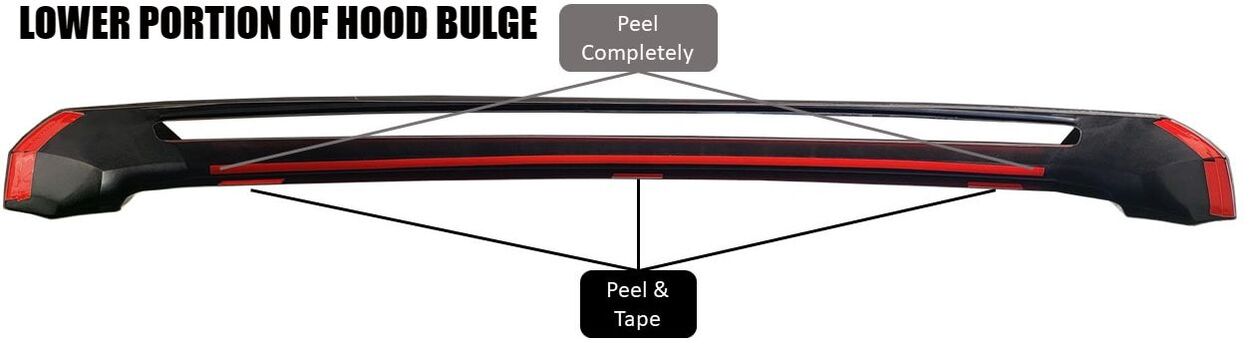
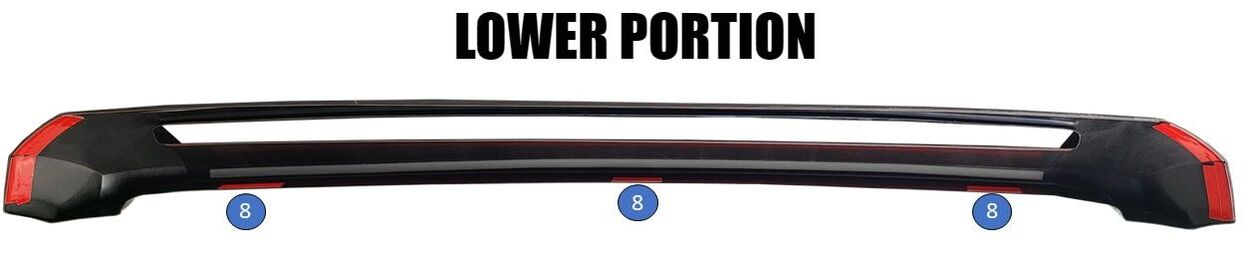
On all inboard sections of tape (1 on the lower portion), completely remove the backing to the 3M tape prior to installation as it will not be accessible following installation.
(note: Since this installation is fairly short, take your time to follow these steps exactly as they will result in the best possible fit. Failure to follow these instructions may lead to portions of visible chrome.)
8. Carefully slip the cover over the hood bulge ensuring no exposed 3M tape contacts the surface before the cover is properly positioned.
9. It is important to align the overlay in critical areas first, where then you will pull back on the section of 3M tape that you taped to the front surface of the part during your preparation. PLEASE FOLLOW THE ORDER INDICATED IN THE PICTURES BELOW FOR PULLING THE RED BACKING OFF YOUR 3M TAPE. FAILURE TO FOLLOW THIS ORDER WILL RESULT IN AN IMPROPER OR INCOMPLETE INSTALLATION.
10. While following the installation order above. Make sure each area is positioned perfectly before peeling back the exposed red 3M tape. After the tape in each area is removed, immediately put firm pressure on the sections where the 3M tape will be contacting the OE surface to make the adhesion permanent.
11. After the Hood Bulge Overlay is completely installed, go back over and put firm pressure on all areas of 3M tape on both the Hood Bulge Overlay and the Grille Surround Overlay.
Care for your BumperShellz™
Care for your BumperShellz™ like you would any fine paint finish. Use high quality cleaning products designed specifically for car care.
Gloss finishes: Oftentimes, minor scratches can be buffed out on the gloss finishes. Rubbing compounds can be used with a mechanical buffer, for deeper scratches.
Matte finishes are much more susceptible to abrasions, leaving a "glossy sheen" on the finish, which are generally permanent. Do not attempt to buff out scratches/abrasions on your matte finish, as this will generally make the damage worse. Avoid excessive friction when trying to remove anything stuck to the matte finish surface and keep cleaning rags/water clean and abrasive free. Abrasive brush-type car washes are not recommended, as they can abrade the Matte finish. Brushless car washes are acceptable.