Ecoological - Truck Aftermarket Accessories
  • Home
  • Products
    • GapShield
    • AeroBox
    • BumperShellz
  • SALE ITEMS
  • 2022+ Tundra BumperShellz
  • New Model Request
  • Become A Retailer
  • Contact Us
  • Manufacturing
  • About Us
  • Videos
  • Toyota Color Match Wait list
  • Installation Instructions Home
    • FORD MODEL YEAR SELECT >
      • 2015-2017 Ford F-150 Installation Instructions Home
      • 2018-2020 Ford F-150 Installation Instructions Home
      • 2017-2019 Ford F-250 Installation Instructions Home
    • CHEVROLET MODEL YEAR SELECT >
      • 2007-2013 Silverado Installation Home
      • 2014-2015 Silverado Installation Home
      • 2016-2018 Silverado Installation Instructions Home
      • 2019-2022 Installation Home >
        • 2019-2021 Front Bumper Installation Home
    • GMC MODEL YEAR SELECT >
      • 2007-2013 GMC Sierra Installations Home
      • 2014-2015 Sierra Installation Home
    • 2016-2018 Sierra Installation Home
    • RAM MODEL YEAR SELECT >
      • 2009-2012 RAM Installation Configuration
      • 2013-2018 RAM Installation Configuration
    • TOYOTA MODEL YEAR SELECT >
      • Tundra Installation Configuration >
        • Tundra Installation Version Selector Page
  • AeroBox Version Installation Selector
  • AeroBox Waitlist
  • Barcelona Red Sign-Up

2016-2023
TACOMA
Rear BumperShellz™ Installation Guide

​Predicted Installation Time: 20 minutes

Items Included

  • Passenger and Driver Side BumperShellz
  • Pre-installed 3M PX tape

Tools Required

  • Isopropyl Alcohol
  • clip removal tool/ small flathead screwdriver
  • plastic pry-tool

Before You Get Started...

Picture
Warm surfaces and 3M tape with heat gun if ambient temperature is below 68 degrees F
Picture
Any Modification or unintended use will void the manufacturers warranty
Picture
A dry fit of all pieces must be performed before the final installation of the product to ensure fit
Picture
Products cannot be returned for a full refund after the red backing to the 3M tape is removed

Getting Started

Picture
1. Detach lower clips to factory bumper cap.
2. Dry-fit each cover by following the below instructions without removing the backing to the 3M double-sided tape.  Ensure edges, sensor holes (if available), and clip holes are properly aligned.
3. Thoroughly clean the bumper surface.
Picture
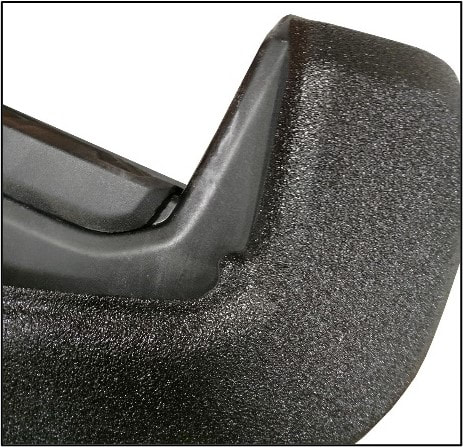
4. Wrap the outboard corner of the BumperShell around the corner of the factory bumper cap.
5. If the bumper has parking sensors/blind-spot sensors, adjust the position of the BumperShell to center the sensor within the clearance hole. Be sure to not let 3M tape touch down before the sensor is centered in the clearance hole. If the tape touches down pre-maturely, it may affect the fit of the cover around the sensor, and the sensor will not appear centered.
Picture
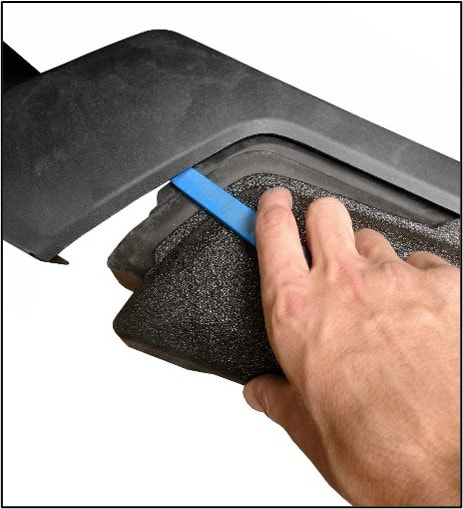
6. Continue installing by slipping the top edge of the cover under the lip of the step pad. You may need to use a plastic trim tool to pry up on the step pad nearest the license plate to allow clearance for the BumperShellz to slip under the step pad.
7. When satisfied Cover is properly positioned, press taped areas against bumper as before, also making sure firm pressure is used to bond the cover to the factory cap.

Prepping the Bumper

Only perform these steps following your (dry-fit)
​7. Wipe the surface of the bumper where the 3M tape will be attaching with the provided adhesion promoter cloth.  A little goes a long way.  Be sure the promoter has dried before attempting to attach the tape.
9. Lastly, ensure that the bumper and tape is warmed to at least 68 degrees F with a hair dryer or heat gun, if ambient temperature is cooler than that.

Installing Your BumperShellz

NOTE for Maximum Adhesion: The acrylic foam tape used to adhere your BumperShellz is “pressure sensitive”, so making sure there is sufficient pressure applied to each of the taped areas is vital to achieve optimum adhesion of your BumperShellz™ to your bumper.  It is also recommended that you come back a few hours later, or the next day, to give each BumperShellz piece another pressure rub to ensure the best adhesion. Allow the tape adhesive to set up for at least 24 hours before washing your truck. Maximum adhesion is reached after 3-5 days in temperatures above 70 degrees, longer if it is cooler.
Picture
11. If your model comes with a protective film from the manufacturer, also peel this back about an inch to ensure it isn't trapped underneath the trim after your installation.
12. Begin installing your BumperShellz starting with the edge facing the wheel well.  The top edge will slip under the body panel just above the bumper.
13. Continue tucking the top edge of the BumperShellz under the top body panel as you move toward the center.
14. Once the inboard edge of your BumperShellz comes in contact with the center valance, begin tucking it underneath the gap in the valance you created by removing the inner bolts.  Begin with the top edge.  Use your trim tool, credit card or squeegee to pin the top edge of the BumperShellz against the back of the bumper.  Then, while pulling out on the center valance, slip the top edge underneath the valance.
15. Continue to tuck the rest of the edge of the BumperShellz under that center valance from top to bottom until no edge is visible.  
16. Now, shift the BumperShellz as far inboard as possible, making sure the maximum amount of edge is firmly overlapped by the center valance.  You will want to keep this force on the BumperShellz as you remove the red backing to the 3M tape by utilizing the tab you secured previously to the front of the part.  If you have sensors, while doing this, ensure the sensor clearance hole in the BumperShellz is properly positioned over its counterpart in the bumper.
Picture
17. Put firm pressure on the 3M taped areas of the BumperShellz to complete the adhesion making sure the cover doesn't creep back outboard.

The Finale

18. If you have parking sensors, reinstall these now by pushing them back through the sensors clearance holes, and reattaching the harness. Replace the white spring clip to secure the sensors.  (The white spring clips will create a minimal "dimple" on the front surface of the part as the clip pulls the sensor bezel tight against the bumper.  This is normal, but sanding, or cutting the springs off of the white clips will eliminate this if you prefer.)
19. Begin re-securing the bolts and washer nuts to the center valance.
20. Begin with the bolt on top of the center valance by reaching through the clearance in the wheel well.  Tighten this bolt completely.
21. Return to the front underside of the bumper to reinstall the washer bolts on the vertical edge of the valance.  Tighten these until they are snug, but be sure not to over-tighten. Over-tightening will slightly torque the BumperShellz, and force them out from underneath the valance and will result in a gap at the lower edge of the bumper.
23. Replace the fender liner, using the bolts, screws, and clips that were removed during the beginning stages of the preparation.  The clips for the screws on the outside of the fender liner will sandwich the chrome tabs in the bumper and the tabs on the BumperShellz will remain on the outside of the black plastic clips.
24. Once again, put firm pressure on the taped areas of the BumperShellz, and remove any protective film.

Care for your BumperShellz™

Most BumperShellz colors will function much like paint.  They can be buffed, polished, taken through automated car washes, and whatever else you would normally do.  Some ABS colors can be sanded down and re-painted if ever you decide you want to change colors.  The only color that cannot be polished, and re-painted is the Textured Black TPO. 

    Show off your truck, WIN a GAPSHIELD

    Send us your Before and After Pictures!  We will show off your truck to the world.  Plus, one winner will be randomly selected each month to receive a free GapShield!  If you'd like us to tag you on Instagram, please include your profile name.
    Max file size: 20MB
    Max file size: 20MB
Submit

Contact Us

Contact Ecoological

Support

Shipping Information
Privacy Policy
Warranty & Return Policy
Terms & Conditions
​© 2023 Ecoological. All rights reserved.

3860 Cincinnati Ave 
Rocklin , CA 95765
  • Home
  • Products
    • GapShield
    • AeroBox
    • BumperShellz
  • SALE ITEMS
  • 2022+ Tundra BumperShellz
  • New Model Request
  • Become A Retailer
  • Contact Us
  • Manufacturing
  • About Us
  • Videos
  • Toyota Color Match Wait list
  • Installation Instructions Home
    • FORD MODEL YEAR SELECT >
      • 2015-2017 Ford F-150 Installation Instructions Home
      • 2018-2020 Ford F-150 Installation Instructions Home
      • 2017-2019 Ford F-250 Installation Instructions Home
    • CHEVROLET MODEL YEAR SELECT >
      • 2007-2013 Silverado Installation Home
      • 2014-2015 Silverado Installation Home
      • 2016-2018 Silverado Installation Instructions Home
      • 2019-2022 Installation Home >
        • 2019-2021 Front Bumper Installation Home
    • GMC MODEL YEAR SELECT >
      • 2007-2013 GMC Sierra Installations Home
      • 2014-2015 Sierra Installation Home
    • 2016-2018 Sierra Installation Home
    • RAM MODEL YEAR SELECT >
      • 2009-2012 RAM Installation Configuration
      • 2013-2018 RAM Installation Configuration
    • TOYOTA MODEL YEAR SELECT >
      • Tundra Installation Configuration >
        • Tundra Installation Version Selector Page
  • AeroBox Version Installation Selector
  • AeroBox Waitlist
  • Barcelona Red Sign-Up