Ecoological - Truck Aftermarket Accessories
  • Home
  • Products
    • GapShield
    • AeroBox
    • BumperShellz
  • SALE ITEMS
  • 2022+ Tundra BumperShellz
  • New Model Request
  • Become A Retailer
  • Contact Us
  • Manufacturing
  • About Us
  • Videos
  • Toyota Color Match Wait list
  • Installation Instructions Home
    • FORD MODEL YEAR SELECT >
      • 2015-2017 Ford F-150 Installation Instructions Home
      • 2018-2020 Ford F-150 Installation Instructions Home
      • 2017-2019 Ford F-250 Installation Instructions Home
    • CHEVROLET MODEL YEAR SELECT >
      • 2007-2013 Silverado Installation Home
      • 2014-2015 Silverado Installation Home
      • 2016-2018 Silverado Installation Instructions Home
      • 2019-2022 Installation Home >
        • 2019-2021 Front Bumper Installation Home
    • GMC MODEL YEAR SELECT >
      • 2007-2013 GMC Sierra Installations Home
      • 2014-2015 Sierra Installation Home
    • 2016-2018 Sierra Installation Home
    • RAM MODEL YEAR SELECT >
      • 2009-2012 RAM Installation Configuration
      • 2013-2018 RAM Installation Configuration
    • TOYOTA MODEL YEAR SELECT >
      • Tundra Installation Configuration >
        • Tundra Installation Version Selector Page
  • AeroBox Version Installation Selector
  • AeroBox Waitlist
  • Barcelona Red Sign-Up

AEROBOX
STANDARD VERSION

​Predicted Installation Time: 30 minutes

TOOLS REQUIRED

  • Center Punch
  • Drill
  • Phillips Screwdriver
  • 5/16”-18 x 1.5” bolt and washer
  • 5/16” and 1/2” wrenches or sockets, pliers
  • 9/64”, 3/8”, 15/32” drill bits

PARTS AND KITS INCLUDED

  • Standard AeroBox™
  • (2) Keyed Cam Locks
  • Load floor

KIT #1 

  • (2) Wheels
  • (2) Axle bolts
  • (2) Main door keys

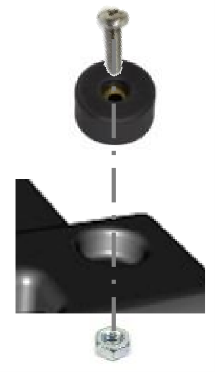
KIT #3A - Rubber Feet

  • (6) Rubber Feet
  • (6) #6-32 X ¾ inch screws for rubber feet
  • (5) #6-32 hex nuts and (5) #6 split washer

KIT #3B - Attachment Hardware

  • (2) 5/16-18 x 2 in. thumb screws
  • (2) 5/16-18 Nylock™ flanged nuts
  • (2) 5/16-18 Pre-bulbed threaded inserts
  • (1) Threaded insert install tool

Before You Get Started...

Picture
Any Modification or unintended use will void the manufacturers warranty
Picture
A dry fit must be performed before the final installation of the product to ensure fit
Picture
Presence of a drop-in bed liner may neccesitate some modification of the bed liner for proper function
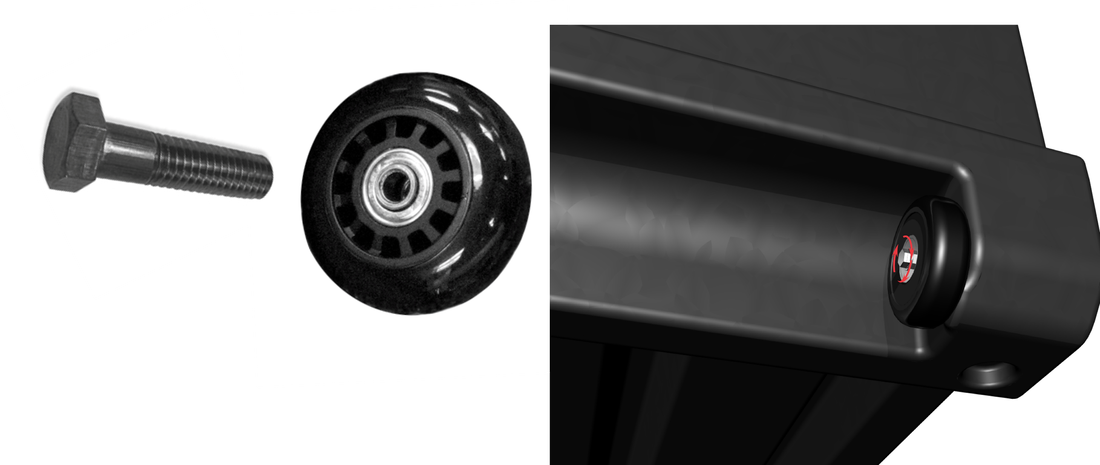
WHEEL INSTALLATION

  1. Place AeroBox™ upside down on clean/non-abrasive surface
  2. Locate the threaded inserts in the wheel pocket
  3. Insert the axle (wheel bolt) through the bearing on the
    wheel and thread in to the threaded insert using ½ inch
    wrench or socket until tight.  Do not overtighten.
  4. Repeat for remaining wheel.
Picture

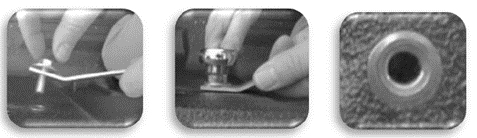
RUBBER FEET INSTALLATION

  1. While in upside down position, drill 9/64” hole at the center mark of each foot location
  2. Position AeroBox™ with door side up
  3. Insert #6 X ¾ inch machine screw through the bumper foot and through drilled hole.
  4. Install split washer and nut on to screw by accessing through AeroBox™ door opening
    (front center location has pre-installed threaded insert)
  5. Repeat for remaining bumper feet
  6. Note: Rubber feet help keep AeroBox from sliding.  In some cases, you may prefer to
    leave off rubber feet for easier sliding.
Picture

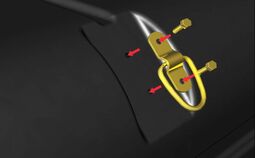
ATTACHMENT METHOD INSTALLATION

1. Check fit by placing AeroBox™ in upright position and sliding it into the tailgate opening of your truck until the door of the AeroBox™ would be flush with the tailgate when the tailgate is closed, but does not inhibit closure.  The AeroBox™ should be centered in the opening. Make sure there will be no interference with closing the tailgate by closing the tailgate with the box in position.​
Picture
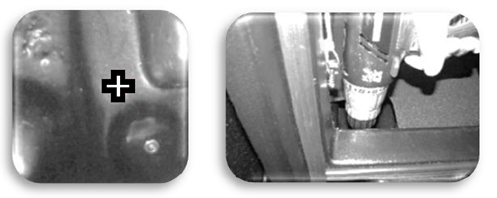
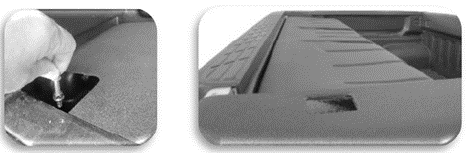
​2. With the AeroBox™ in desired location, center punch a hole location roughly centered in the load floor hand access cut-out and the channel at the base of the AeroBox™ as shown below for both the left-side and right-side attachment locations. Drill a 3/8” inch hole through the floor of the AeroBox™ only.  Make sure hole location will land on flat area on truck bed surface (not on side of corrugation). If not, reposition box.
Picture
3. Using previously drilled holes as guides, drill through the truck bed floor (and liner, if present) at both locations.
Do not move AeroBox™ until both holes are drilled.  Re-check alignment, if necessary.
4. Remove the AeroBox™ and re-drill/enlarge the holes in the truck bed with a 15/32” drill.
5. To secure pre-bulbed threaded insert, assemble two washers on a 5/16”- 18 bolt x 1 ½” min. (not included) and extend bolt through hole in threaded insert assembly tool. Thread insert on to bolt until tight and place the pre-bulbed threaded insert through the previously drilled hole in the truck bed floor. Grasp the threaded insert assembly tool tightly (use protective gloves) to keep it from rotating and flush with sheet metal while tightening bolt with 1/2“ socket, wrench, or impact wrench (preferred), until threaded insert is fully compressed (clamped tight on to sheet-metal). Be careful not to overtighten to avoid stripping threads.  Unscrew the bolt when finished and repeat on other side.
Picture
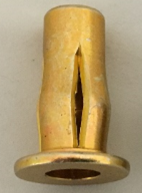
Pre-Bulbed Threaded Insert
Picture
Note: Bolt will be difficult to turn at first, gets easier as the threaded insert begins to compress, then very difficult when fully compressed.
Hint: When a drop-in liner is present, the liner will need to be raised up so the threaded rivet will clamp directly to the truck bed sheet metal floor.
6. To secure your AeroBox™ in the truck bed, slide it into position, open the door, and insert the thumbscrew fastener through the drilled hole in the floor. Align thumbscrew with the threaded insert and tighten until flanged nut bottoms out on AeroBox. Repeat for the other side. In this configuration, the tailgate is used as an additional constraint and must be closed to fully secure the AeroBox™ when vehicle is in motion.​
Picture
Note: Thumb screw comes pre-assembled with a nylock nut with the flanged side pointing toward the insertion end. The nylock nut can be adjusted up or down, depending on the required clamp range
Picture
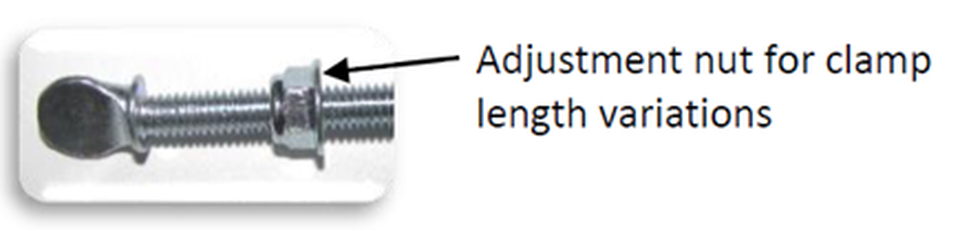
Hint: Adjust the nut so thumb screw extends just a few turns in to the threaded insert when fully tightened. This will keep the number of rotations required to tighten down box to a minimum, saving you time. Pliers can be used to fasten more tightly and/or remove when too tight to remove by hand.
Note: Fasteners can be tethered to the box with string to keep them from being misplaced. ​

IMPROPER USE WARNING

Placing very heavy items in the AeroBox™ combined with rough terrain and/or heavy braking could result in your AeroBox™ coming loose and/or damage to the attachment assembly. Additional tie downs may be necessary in these situations

    Show off your truck, WIN a GAPSHIELD

    Send us your Before and After Pictures!  We will show off your truck to the world.  Plus, one winner will be randomly selected each month to receive a free GapShield!  If you'd like us to tag you on Instagram, please include your profile name.
    Max file size: 20MB
    Max file size: 20MB
Submit

Contact Us

Contact Ecoological

Support

Shipping Information
Privacy Policy
Warranty & Return Policy
Terms & Conditions
​© 2023 Ecoological. All rights reserved.

3860 Cincinnati Ave 
Rocklin , CA 95765
  • Home
  • Products
    • GapShield
    • AeroBox
    • BumperShellz
  • SALE ITEMS
  • 2022+ Tundra BumperShellz
  • New Model Request
  • Become A Retailer
  • Contact Us
  • Manufacturing
  • About Us
  • Videos
  • Toyota Color Match Wait list
  • Installation Instructions Home
    • FORD MODEL YEAR SELECT >
      • 2015-2017 Ford F-150 Installation Instructions Home
      • 2018-2020 Ford F-150 Installation Instructions Home
      • 2017-2019 Ford F-250 Installation Instructions Home
    • CHEVROLET MODEL YEAR SELECT >
      • 2007-2013 Silverado Installation Home
      • 2014-2015 Silverado Installation Home
      • 2016-2018 Silverado Installation Instructions Home
      • 2019-2022 Installation Home >
        • 2019-2021 Front Bumper Installation Home
    • GMC MODEL YEAR SELECT >
      • 2007-2013 GMC Sierra Installations Home
      • 2014-2015 Sierra Installation Home
    • 2016-2018 Sierra Installation Home
    • RAM MODEL YEAR SELECT >
      • 2009-2012 RAM Installation Configuration
      • 2013-2018 RAM Installation Configuration
    • TOYOTA MODEL YEAR SELECT >
      • Tundra Installation Configuration >
        • Tundra Installation Version Selector Page
  • AeroBox Version Installation Selector
  • AeroBox Waitlist
  • Barcelona Red Sign-Up