Paint Preparation Instructions Link
If you ordered the "Paintable" version, click on the instructions link above for paint prep, and trim installation instructions.
Items Included• Left and Right BumperShellz™
|
Tools Required• Flat head screwdriver
• Plastic (non-scratch) Prying tool • Pliers |
Before You Get Started...

Warm surfaces and 3M tape with heat gun if ambient temperature is below 68 degrees F
|

Any Modification or unintended use will void the manufacturers warranty
|

A dry fit of all pieces must be performed before the final installation of the product to ensure fit
|

Products cannot be returned for a full refund after the red backing to the 3M tape is removed
|
Preparation
If your bumper has any significant pre-existing dents, you may want to remove the bumper and try to pound some of these out. Small dings and rust can usually be directly covered by BumperShellz™ if trim lines between plastic trim/step pad and exposed steel bumper are in their original shape. A distorted bumper will negatively affect the fit of your BumperShellz™.
Make sure your bumper is clean, dry, and free of debris. Use a cleaner that will remove oil/grease to clean bumper surface, followed by wiping the bonding surface areas of your bumper thoroughly with regular isopropyl rubbing alcohol and a clean lint-free white cotton rag or clean disposable toweling. Do not use shop rags which may have dirt or oily residues. For superior results use 3M brand Prep Solvent 70 or similar products available at many auto stores.
Installation
|
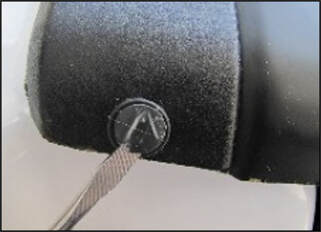
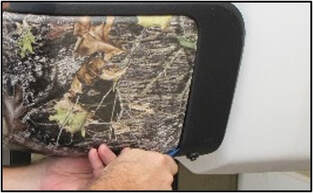
1. Remove the outboard push-pin clips
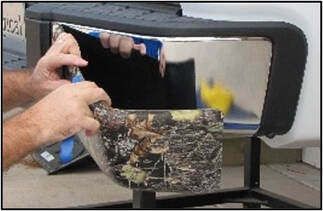
2. Begin your BumperShellz™ installation by peeling red backing off the tape strips on the back surface of your BumperShell. Try not to allow tape to contact bumper until BumperShell is in its proper/final position.
|
|
|
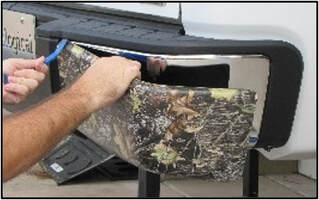
3. Start at the lower inboard corner flange and tuck it and the rest of the inboard side flange under the center trim. Then gently pry up the step pad edge at the upper inboard corner and begin tucking the top perimeter flange under the step pad trim edge using the same technique of lifting and sliding. Do not use excessive force, as this may damage your BumperShellz™ and/or trim. If the BumperShellz™ are not going on, a flange is probably hung up somewhere on the trim.
|
|
|
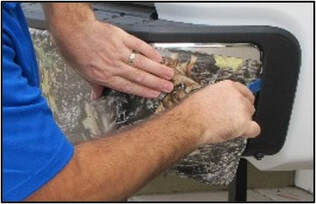
4. Before completely tucking in the top perimeter flange, tuck the outboard upper corner of your BumperShellz™ under the trim and then finish tucking in the top flange. Finally, tuck in the outboard side flange and then lower outboard corner
NOTE: If you have factory reverse sensors, a clearance hole has been removed from the area in front of the sensor. Some slight adjustment may be needed to center the sensor within the hole BEFORE pressing down on the tape.
|
|
|
5. If any clips were removed, you can now replace them while making sure the BumperShellz™ remain in the proper position at all times. The BumperShellz should now be snugly fit over the steel bumper.
|
|
|
6. Press the BumperShellz™ against the bumper in all taped areas and hold for 30 seconds to make sure the tape is adhered.
|
|
NOTE for Maximum Adhesion: The acrylic foam tape used to adhere your BumperShellz is “pressure sensitive”, so making sure there is sufficient pressure applied to each of the taped areas is vital to achieve optimum adhesion of your BumperShellz™ to your bumper. It is also recommended that you come back a few hours later, or the next day, to give each BumperShellz piece another pressure rub to ensure the best adhesion. Allow the tape adhesive to set up for at least 24 hours before washing your truck. Maximum adhesion is reached after 3-5 days in temperatures above 70 degrees, longer if it is cooler. Once the adhesive has fully bonded to a properly prepared bumper surface, it is nearly impossible to remove the BumperShellz without damaging them. Please refer to “removal instructions” in the BumperShellz FAQ section on the website, should removal be necessary
Care for your BumperShellz™
Care for your BumperShellz™ like you would any fine paint finish. Use high quality cleaning products designed specifically for car care.
Gloss finishes: Oftentimes, minor scratches can be buffed out on the gloss finishes. Rubbing compounds can be used with a mechanical buffer, for deeper scratches.
Matte finishes are much more susceptible to abrasions, leaving a "glossy sheen" on the finish, which are generally permanent. Do not attempt to buff out scratches/abrasions on your matte finish, as this will generally make the damage worse. Avoid excessive friction when trying to remove anything stuck to the matte finish surface and keep cleaning rags/water clean and abrasive free. Abrasive brush-type car washes are not recommended, as they can abrade the Matte finish. Brushless car washes are acceptable.