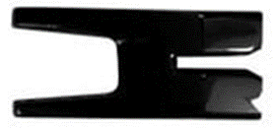
Items Included• Side Covers: 2
• Center Cover: 1 • Preinstalled 3M Tape • 2 Adhesion Promoter Packets |
Tools Required• Isopropyl Alcohol/clean rags
|

Before You Get Started...

Warm surfaces and 3M tape with heat gun if ambient temperature is below 68 degrees F
|

Any Modification or unintended use will void the manufacturers warranty
|

A dry fit of all pieces must be performed before the final installation of the product to ensure fit
|

Products cannot be returned for a full refund after the red backing to the 3M tape is removed
|
Paint Preparation Instructions Link
If you ordered the "Paintable" version, click on the instructions link above for paint prep, and trim installation instructions.
Preparation
The degree to which you follow these preparation instructions will determine the quality of the installed product. Please follow all instructions and be patient. If you are unsure of any area of the installation after reading these instructions, please call us at 844-918-3688, and we will answer any questions that you have.
Installation
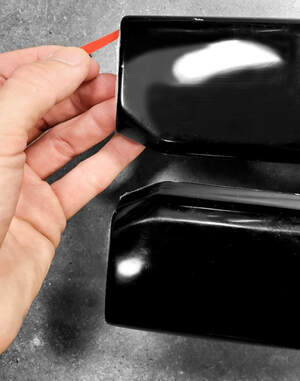
NOTE: We recommend Dry-Fitting all BumperShellz pieces to their specific locations BEFORE removing ANY of the red backing strips from the tape. Make sure all pieces are correct, i.e., you have received all pieces shown above, with or without sensor holes and/or fog lamp openings, color/pattern is correct, and that all are undamaged. There should not be any (or extremely minimal) bumper surface visible once flanges are slid under trim and sensor holes (if present) are centered over sensor trim. Dry Fitting is also good practice for lining up each piece and guiding it into place, visualizing how to do it when the backing strips are removed and the tape is STICKY. Note that once the backing is removed we cannot give full credit for return.
1. Ensure the grille surface is clean and free of debris. Use Isopropyl rubbing alcohol to free the grille surface of any chemicals or soap residue that may limit the effectiveness of the 3M tape. Wipe the adhesion promoter towel along all areas of the bumper where the 3M tape will be contacting.
Center Cover

2. Begin by installing the center cover. Remove the red backing to the 3M tape on all surfaces. Once you are satisfied with its position, put firm pressure on the areas of the grille where the 3M tape will be contacting the grille.
HINT: the top grille bar is slightly skinnier than the bottom bar. Keep that in mind when trying to determine which side of the cover is up.
HINT: the top grille bar is slightly skinnier than the bottom bar. Keep that in mind when trying to determine which side of the cover is up.
|
Side Covers |

|
|
3. Next, install each of the side covers. Remove all red backing to the 3M tape except the perimeter tape. For the perimeter tape, peel back a small section and tape it to the front surface of the part to be removed later. Note that they side covers will overlap the center cover by at least ¼”. Take care to make sure the style lines are correctly aligned, and no chrome is showing before putting firm pressure on the surface where the 3M tape will be contacting the grille.
|
|
|
|
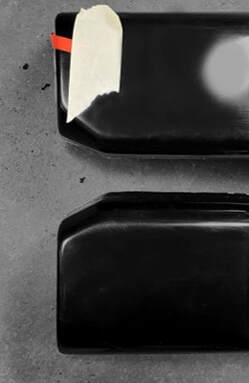
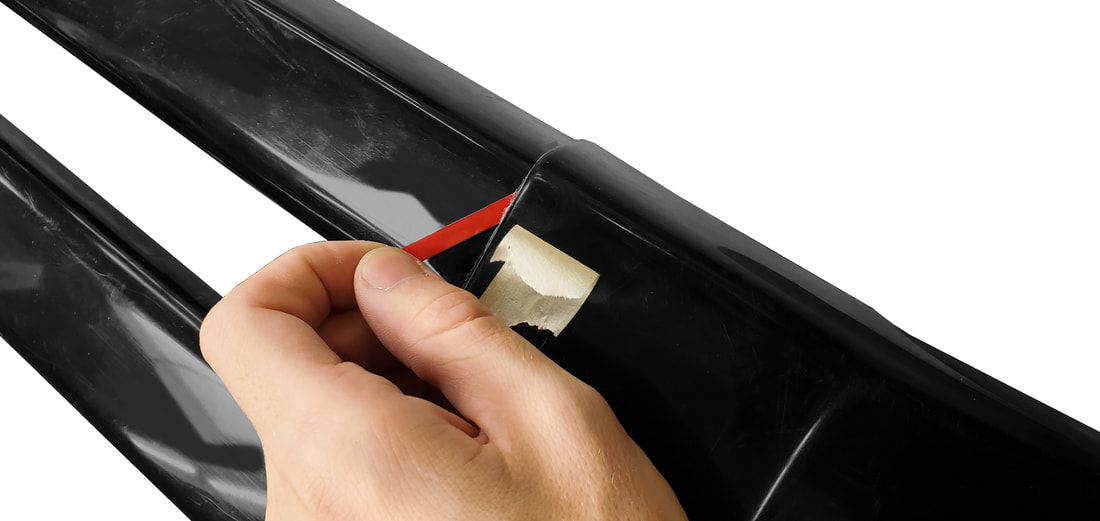
4. Finally, peel off the red backing to the perimeter tape that were previously attached to the front surface of the part and apply firm pressure to those areas to assure a secure bond.
|
|
NOTE: If you have installed an aftermarket grille, there is the potential that the OE grille bar position has shifted so that the space between the grille bar and headlight housings have shrunk making it difficult to slip the side grill covers between. It will appear that the side covers are being held off. If it is not possible to shift the grille bar enough to create this gap again, you will need to cut around the housing on the side covers.
5. If possible, wait at least 48 hours before engaging in highway driving, or using automated car washes. Reapply pressure to all taped areas 24 hours after initial installation.
Care for your BumperShellz™
Care for your BumperShellz™ like you would any fine paint finish. Use high quality cleaning products designed specifically for car care.
Gloss finishes: Oftentimes, minor scratches can be buffed out on the gloss finishes. Rubbing compounds can be used with a mechanical buffer, for deeper scratches.
Matte finishes are much more susceptible to abrasions, leaving a "glossy sheen" on the finish, which are generally permanent. Do not attempt to buff out scratches/abrasions on your matte finish, as this will generally make the damage worse. Avoid excessive friction when trying to remove anything stuck to the matte finish surface and keep cleaning rags/water clean and abrasive free. Abrasive brush-type car washes are not recommended, as they can abrade the Matte finish. Brushless car washes are acceptable.